Unlocking Excellence: The Power of Remote Management Modules
Published: January 13, 2022
By: Matt Monday
Monitor the Health of Your IT Infrastructure with a Remote Management Module

REMOTE MANAGEMENT MODULE (RMM)
One of the highest priorities that an IT professional has is keeping servers and storage online and operating. It is a demanding task when IT personnel are present onsite. It is even more challenging when they are not. The old adage “knowledge is power” is especially true in the IT department. Knowing the status of servers and storage devices, and early warning of potential problems is the most powerful tool an IT professional can have to help him or her achieve the goal of maximum uptime with remote management tools.
In order to help IT professionals achieve this goal, Nfina offers the Remote Management Module (RMM).
The RMM consists of a small board that unlocks the Remote Management features, and a dedicated server management NIC. The host system is unaware of the dedicated server management NIC, and this NIC will not share the network bandwidth of the system.
The RMM gives systems administrators three important areas of functionality that will enable them to keep a server up and running with remote managing tools.. The first is the ability to set up alerts, because knowing there is a problem and early warning that something is amiss can be key in eliminating downtime. The second is the ability to discern what is wrong and the history of the problem. Items found under the Server Health tab of the RMM contain this information. Lastly, the remote control functionality of the RMM allows a systems administrator to log into the console and operate as if they were on site, locally connected to the server. An administrator can generate and migrate virtual machines, deploy resources, and execute any task that could be performed locally at a console attached to the server. This translates to quicker response to the needs of the organization, and allows an administrator to handle requests and situations without traveling to the site. There is also the ability to mount an IDE, CD ROM, or USB flash disk as a remote device, providing the ability to install software (including operating systems), copy files, and update BIOS. An administrator can power down, reboot, and enter into the BIOS setup. This is an extremely powerful diagnostic and troubleshooting tool that can provide a means to correct problems quickly without having to physically go to the server site.
The RMM is functional even when the server is down, allowing a remote user to ascertain the status, and attempt to correct any problems and get the server functional again. This is far superior to software solutions that require the server to be functioning to monitor or configure the server.
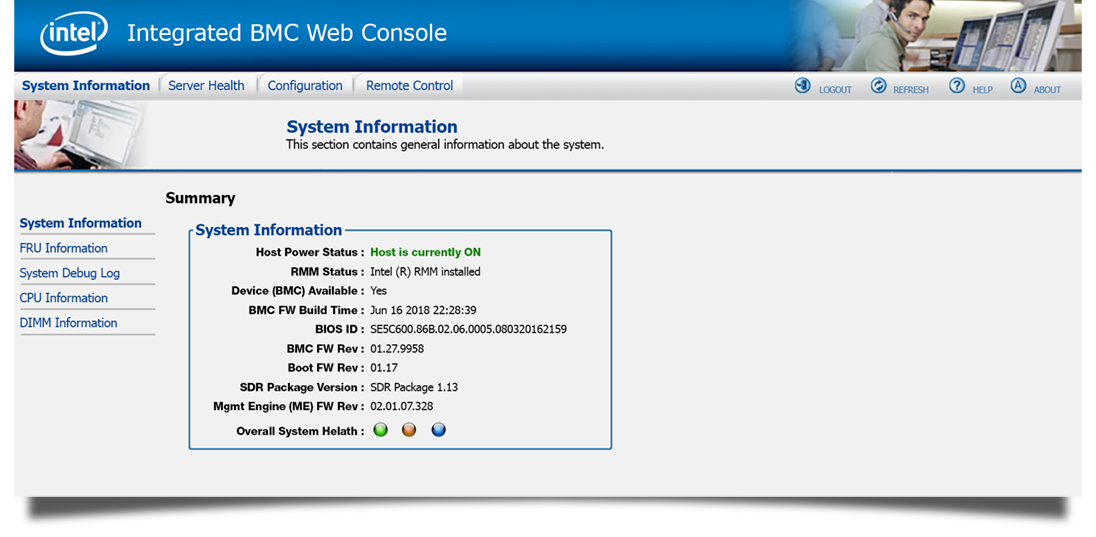
Entering the IP address that has been associated with the RMM accesses the login screen of the RMM. Users are assigned usernames, passwords, and can be assigned different privilege levels, thereby enabling them to perform functions or limiting the extent of their activities. After a user securely gains access, the user is presented with the Integrated BMC Web Console as shown in figure 1. This window has 4 tabs on the top menu bar: System Information, Server Health, Configuration, and Remote Control. Clicking on any of these tabs will open a window displaying information relating to the tab and a secondary menu on the left side of the screen. Clicking on the items in the secondary menu will display a screen relevant to that item.

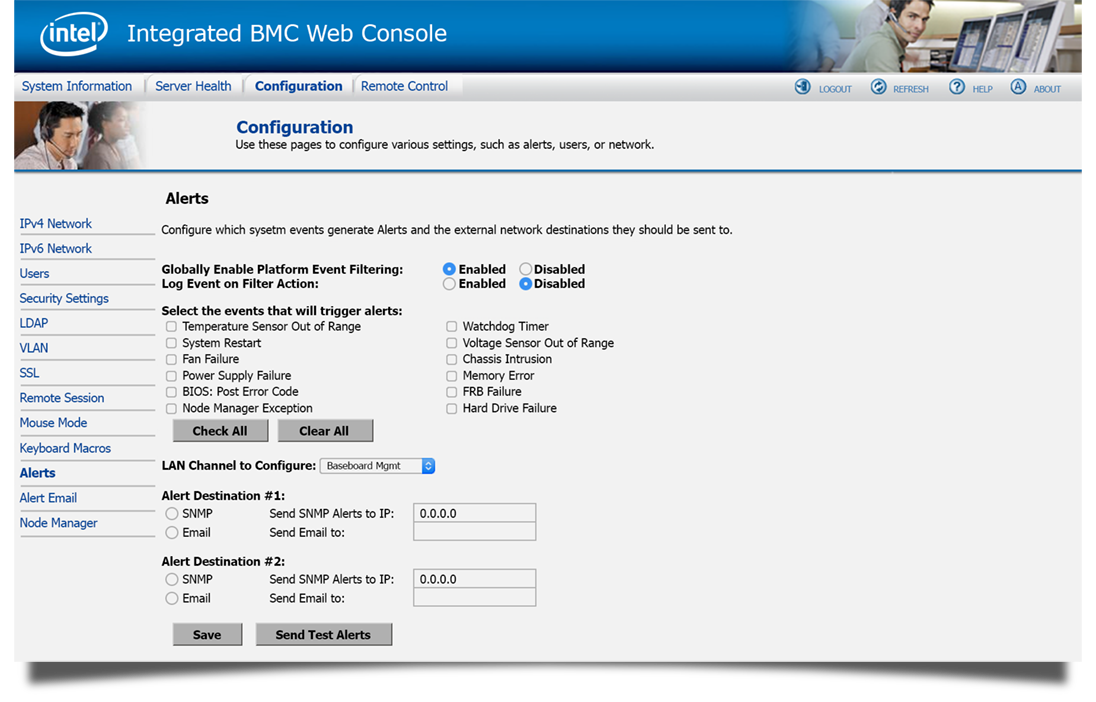
While there is a wealth of information and functionality in the various menus of the web console, one that will prove highly useful to IT professionals is the Alerts page under the Configuration tab. Clicking on it will bring up the page shown in Figure 2 below:

This functionality allows an IT professional to configure the RMM to notify 2 destinations if any of the 12 events occurs. The notification can be an email, an SNMP alert or both. This is an extremely powerful tool, because in many cases the system will still be running after an event, and the alert can give administrators time to correct the problem before an outage occurs. An example of this would be power supply failure in a server with redundant power supplies. If a power supply has failed, the server will continue to run, but there is now a single point of failure and no fault tolerance with respect to the power supply. If the second power supply fails the server will fail. Notification of a power supply failure can provide an administrator with enough notice to intervene before a complete failure of the system.
Perhaps the second most important functionality of the Web Console is the Server Health tab. Under this tab are selections that will display the status and readings of all sensors on the server (Figure 3).

There is also an event log (Figure 4) that will indicate events by sensor name, type, time of event, and a description of the event. Consulting the sensor readings and the event log will provide valuable information about the current condition of the server and the events, if any, that have led up to the current condition. This should give the systems administrator an indication of where to begin troubleshooting or which corrective actions are necessary.

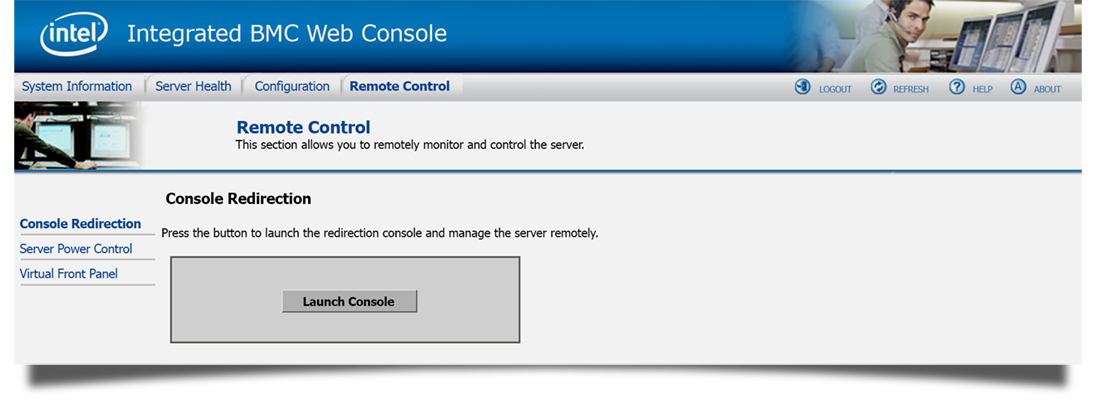
Once issues have been identified and diagnosed, systems administrators can use the Remote Control feature to attempt corrections. Selecting Remote Control from the top menu and then selecting console redirection from the left hand menu produces the screen shown in Figure 5. Clicking on the Launch Console button will allow the system administrator to manage the server remotely, and the screen, mouse, and keyboard at the remote location will function as if the system administrator were on site and connected to the server.

Remote troubleshooting sometimes involves rebooting, power cycling, or accessing system BIOS. These actions cannot be performed using the console. The Remote management module has functionality that will allow a system administrator to perform these tasks remotely. Selecting Server Power Control on the left side menu under the Remote Control tab accesses this functionality. The screen shown in Figure 6 appears.

Table 1 – Remote Control Power Control Options
Note: – Force-enter BIOS setup on Reset is a function of Intel Xeon Processor E5-4600/2600/2400/1600/1400 only. – Force-enter BIOS setup on Power-on is a function of S1200V3RP only. – On other processors the user has the ability to manually enter BIOS setup. – All power control actions are done through the BMC and are immediate actions
The Remote Management Module has additional capabilities beyond those outlined in this white paper, but it is easy to see the value of being alerted when there is a problem, being able to log in for current status and event history, and the ability to run a remote console and perform troubleshooting or maintenance on the server. The Remote Management Module provides early warning as well as an opportunity to get in front of a server problem and resolve it before an outage occurs. It also enables IT professionals to be more responsive and productive for their enterprise. For more information, call Nfina and our knowledgeable sales and support staff will be glad to answer any questions you may have.
BMC Setup
The information below provides instructions needed to set up the Integrated BMC Web Console on Nfina platforms. There are two ways to set up the Integrated BMC Web Console:
- Through the BIOS (machine reboot is required)
- Through the SysCfg tool (only supported on Windows, RHEL, and SLES)
Configure the MGMT IP using BIOS
- During POST, select F2 to enter the BIOS setup page.
- Select the ‘Server Management’ tab, scroll down and select ‘BMC LAN Configuration’.
- Under ‘Dedicated Management LAN Configuration’ enter the ‘IP Address’, ‘Subnet Mask’, and ‘Gateway IP’. This section should also indicate that the RMM4 is present.
- Under ‘Dedicated Management LAN Configuration’ enter the ‘IP Address’, ‘Subnet Mask’, and ‘Gateway IP’. This section should also indicate that the RMM4 is present.
- Navigate to the top of the BMC LAN Configuration menu and select ‘User Configuration’.
- Scroll down to ‘User ID’ and select the desired user.
- Scroll down to ‘User Status’ and select ‘Enabled’.
- Scroll down to ‘User Name’ and edit as needed.
- Scroll down to ‘User Password’ and enter a new password.
- When complete, press F10 to save and exit. The server will reboot with the new settings.
Configure the MGMT IP using SysCfg
- Download the required tool: https://downloadmirror.intel.com/27790/eng/Syscfg_V14_1_Build21_AllOS.zip
- Install the drivers based on the OS used.

The commands to give the port an IP Address are ready to execute. Browse from the command line to the location of the SysCfg.exe file and execute the following commands.
- Enable the remote management capabilities for a channel. LAN channel 3 (the dedicated management port) will be enabled. Examples below enable: a. DHCP, b. static addressing.
- syscfg /le 3 dhcp
- syscfg /le 3 static IPADDRESS SUBNETADDRESS
- Enable a gateway if required. A gateway is not necessary unless the management interface needs to be connected from outside the LAN. The command to set the gateway is:
- syscfg /lc 3 12 GATEWAYADDRESS
- Set a username and password for log in. The username for User 2 is set to root. Enter the selected username for User 3: syscfg {/u | /user} User_ID User_name Password. Examples:
- syscfg /u 2 “root” “mypassword”
- syscfg /u 3 “username” “mypassword”
- The user must also be enabled on the correct LAN channel: syscfg {/ue | /userenable} User_ID {enable | disable} Channel_ID
- Example: syscfg /ue 3 enable 3The commands to give the port an IP Address are ready to execute. Browse from the command line to the location of the SysCfg.exe file and execute the following commands.
Connecting to the Web Console
To connect to the web console make sure the MGMT port located on the back of the server is connected to the network. This port is labelled MGMT on rack mount systems and outlined in green on tower systems. In order for the remote KVM to function correctly, the Firefox browser should be used.
Browse to the assigned IP address and login with the designated username and password.
What is a Remote Management Adapter?
A remote management adapter, also known as a remote KVM (Keyboard, Video, Mouse) device or IPMI (Intelligent Platform Management Interface) card, is a specialized hardware component used in computer systems and data centers to remotely monitor and manage servers. This RMM remote management module adapter enables administrators to access and control servers from anywhere in the world without physically being present at the server location. It provides an out-of-band management solution that operates independently from the primary network connection of the server.
By connecting to a dedicated Ethernet port on the server’s motherboard, this adapter allows for secure and uninterrupted access to control servers via web browsers or specialized software applications. Remote management adapters offer various functionalities such as power cycling, system health monitoring, firmware updates, virtual media support for CD/DVD redirections over LAN connections, and even graphical console interactions with BIOS settings.
These powerful tools enhance efficiency by enabling IT professionals to troubleshoot issues remotely without disrupting ongoing operations or requiring costly travel expenses.

